
Wednesday, 20 May 2020
How to Clear RAM Memory Cache, Buffer and Swap Space on Linux
Like any other operating system, GNU/Linux has implemented memory management efficiently and even more than that. But if any process is eating away your memory and you want to clear it, Linux provides a way to flush or clear ram cache.
How to Clear Cache in Linux?
Every Linux System has three options to clear cache without interrupting any processes or services.
1. Clear PageCache only.
# sync; echo 1 > /proc/sys/vm/drop_caches
2. Clear dentries and inodes.
# sync; echo 2 > /proc/sys/vm/drop_caches
3. Clear pagecache, dentries, and inodes.
# sync; echo 3 > /proc/sys/vm/drop_caches
Friday, 19 April 2019
Terms and Conditions of Use Recover logical volumes data from deleted LVM partition
Have you
ever deleted a logical volume by accident? Can you recover it looking
into the backups? Well, the answer is YES. For those who are not
familiar with Logical Volume Management (LVM) is a device mapper target that provides logical volume management for the Linux kernel.- Wikipedia. It
is an abstraction layer or software that has been placed on top of your
hard drive for flexible manipulation of the disk space. Some of the
articles published in the past on LVM are:
- Add and Extend disk on Virtual Box through LVM
- Move your /home to a new LVM partition
- Part 1 on Managing LVM with PVMOVE
- Part2 on Managing LVM with PVMOVE
- Ansible playbook to configure LVM
All
test carried out on this blog post have been tested on a CentOS
machine. Please don't make a live test on a production server.

1. So, as you can see below I have an lv called lvopt which is from a vg called centos.

2. Same is mounted on the /opt
3. There are some data in that partition as well:

4. I created a directory inside the /opt directory

5.
Now, let's pretend to remove the lvm lvopt. Or say, someone did it by
accident because it was unmounted. The command lvremove will be used
here to remove the lv. Note: that the lv need to be unmounted.

6.
If you make an lvs, lvdisplay or vgs or even mount again the partition,
you cannot do it. The data is lost. But you can still recover it. This
is because the lvm contains the archive of your lv inside the folder
/etc/lvm/archive. But, you cannot read the files directly.
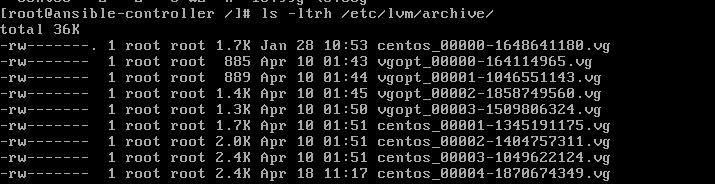
7.
But you can still, interpret part of the files. Since we deleted the
volume group called "centos", we knew that it is referenced in the file
centos_... The question that arises here is which file is relevant for
you. Right? So to understand which archive you want to restore, you need
to use the command vgcfgrestore --list <name of volume group>.
Here is an example:

8.
If you observe carefully, each archive has been backup at a certain
time. In my case, I deleted the LV on 18-Apr-2019 at 11:17:17 2019:

9.
So, I want to restore from that last archive. You will need to copy the
full patch of the vg file. In my case it is
/etc/lvm/archive/centos_00004-1870674349.vg. The goal here is to restore
the lv before this specific time, or simply restore back the lv before
the command lvremove was fired. Here is the command:

10. If you launch the command lvs, you will notice the presence of the lv.

11.
But, mounting back the lv won't result in anything. This is because the
lv is inactive. You can see it with the command lvscan. Please take
note below that the lvopt is inactive.

12. To activate it you simply need to use the command lvchange.

13. Mount it back and you are done.

I
believe this can be very useful especially when you have encountered a
situation where someone deleted an lv. I hope you enjoy this blog post.
Please share and comment below if you like it.
Thursday, 24 January 2019
Downloading a Specific Version of Package and Its Dependencies from Repository for Offline Installation Using YUM
Question : How to download a specific version of the package along with its dependencies using YUM offline.
Answer :
1. To see what particular versions are available to you via yum you can use the –showduplicates switch.
For Example :
2. If there is a need to download the older version package along
with its dependencies for an off-line installation, you can use one of
the following options to download a particular version of RPM from the
web, and then use yum to install it.
For example :
To download the package to a local folder try the option “- -destdir=DESTDIR”
For example :
To download the packe along with all dependencies, use option “- -resolve” along with “- -destdir”
Answer :
1. To see what particular versions are available to you via yum you can use the –showduplicates switch.
# yum --showduplicates list [package_name]
# yum --showduplicates list httpd
Loaded plugins: product-id, security, subscription-manager.
Installed Packages
httpd.x86_64 2.2.15-39.0.1.el6 @ol6_x86_64_latest         --- installed
Available Packages
httpd.x86_64 2.2.15-5.0.1.el6 ol6_x86_64_latest           --- older versions
httpd.x86_64 2.2.15-9.0.1.el6 ol6_x86_64_latest
....
Method 1
To download the packages into a local directory, use – -downloaddir=[dir] option along with the –downloadonly switch of yum command.# yum install --downloadonly --downloaddir=[directory] [package]
# yum install --downloadonly --downloaddir=/tmp/ httpd.x86_64 2.2.15-5.0.1.el6
Method 2
To download package with its dependencies using yumdownloader :# yumdownloader [package]
# yumdownloader --destdir=[DIR] [package]
# yumdownloader --destdir=/tmp httpd.x86_64 2.2.15-5.0.1.el6
# yumdownloader --destdir=[DIR] --resolve [package]
Installing packages locally
Now install the packages from the local directory with yum command option “localinstall”# yum localinstall [path to rpm]
Monday, 5 November 2018
Install OpenFire 3.8.1 on CentOS 6.4 x86_64
Install OpenFire 3.8.1 on CentOS 6.4 x86_64
Install Centos 6.4 x86_64
- Be sure to only do the “minimal” install — use the minimal ISO from here
This installs the dependencies:
yum -y install wget java glibc.i686
Change to the /tmp directorycd /tmp
Download the RPM from this page -or- use this direct link for the RPM.wget http://download.igniterealtime.org/openfire/openfire-3.8.1-1.i386.rpm
Run and install the RPMyum -y install ./openfire*rpm
Once the RPM has been installed, start the openfire serviceservice openfire start
Ensure that openfire will boot with your serverchkconfig –level 235 openfire on
For this instance, you’ll want to make sure iptables is not running,
you can configure the iptables rules how you need them later.service iptables stop
Install mysql serveryum -y install mysql-server
Start mysql server/sbin/service mysqld start
Ensure mysql starts when the server does/sbin/chkconfig mysqld on
Start the basic mysql secure install/usr/bin/mysql_secure_installation
hit “enter” to give no passwordgenerate and save a new root password
hit “enter” aka “Y” on the rest of the questions
Restart mysql server
/sbin/service mysqld restart
Login to mysql as root (use the new root password you just entered)/usr/bin/mysql -u root -p
Create databaseCREATE DATABASE openfire;
Create user (update *username* and *securepassword* below)INSERT INTO mysql.user (User,Host,Password) VALUES(‘username’,’127.0.0.1′,PASSWORD(‘securepassword’));
Save your changesFLUSH PRIVILEGES;
Give the user access to the databaseGRANT ALL PRIVILEGES ON openfire.* to openfire@127.0.0.1;
Save your changesFLUSH PRIVILEGES;
Exit mysqlexit
Navigate in your browser tohttp://yourdomain.com:9090
Follow the steps, enter in the mysql information that you created
when prompted for a database. You are now good to go! Don’t forget to
update your iptables, learn moreOpenfire 4.2.3 installation and config at centos 6
Openfire 4.2.3 installation and config at centos 6.X
my server is centos 6.10 32 bit
rpm is openfire-4.2.3-1.i686.rpm RPM (32bit JRE bundled) for Red Hat Linux
openfire-4.2.3-1.x86_64.rpm RPM (64bit JRE bundled) for Red Hat Linux
client system is windows or centos
client software is
https://pidgin.im/download/windows/
https://pidgin.im/download/linux/
steps:
Openfire
is a real time collaboration (RTC) server licensed under the Open
Source Apache License. It is also known as Jabber. It uses the only
widely adopted open protocol for instant messaging, XMPP. The full name
of XMPP is Extensible Messaging and Presence Protocol. It is a real-time
communication protocol (which includes chat) based on XML. Installation
and the management of Openfire is pretty simple.
It should be noted that with Openfire, no
chat is possible yet. A client is needed: Openfire cannot be used
alone, just like web servers need a browser.
In this tutorial we will see, how to install Openfire in a clean minimal installation of CentOS 7.
First of all we need to install some important tools like vim, wget.
yum install -y vim wgetDownload and install Openfire
We have to download the rpm directly to /home from Ignite Real time website.
wget http://download.igniterealtime.org/openfire/openfire-4.2.3-1.i686.rpm
this one is lower version so before download kindly check latest version
https://www.igniterealtime.org/downloads/
Install it using yum command
yum install -y /home/openfire-4.2.3-1.i686.rpm
Install libraries
yum install -y glibc.i686
Start service after every reboot
chkconfig openfire on
And start the openfire service
systemctl start openfire.service
Update IPtables
firewall-cmd --permanent --zone=public --add-port=9090/tcp
firewall-cmd --permanent --zone=public --add-port=9091/tcp

firewall-cmd --reload
other wise flush the filrewalliptables -F Install PostgreSQL database
For running XMPP we have to setup a Database, We choose postgreSQL which is comes in CentOS 7 by default.
Shoot the following command to install PostgreSQL
yum install -y postgresql postgresql-server postgresql-devel postgresql-libs
Enable PostgreSQL to start after each reboot
systemctl enable postgresql.service
Initialize directory structure and postgres system database
postgresql-setup initdb
Start the service.
systemctl start postgresql.service
PostgreSQl is now running. Now we need to create a database and a dedicated database user for Openfire.
For full administration access, switch to postgres user.
su postgres
Now we are on postgres shell and we will proceed with database and user creation and will setup the password for the user.
For create new database for openfire, Run the following command
createdb openfire
Run the following command to create the database user for openfire
createuser -P openfire
The ‘-P’ parameter ensures that the shell will explicitly ask for user’s password and you will need to type it in.
Now the user openfire is secured with a password.
We can setup password for administration postgres user by the following command
psql -U postgres -d postgres -c "ALTER USER postgres WITH PASSWORD 'OUR-CHOSEN-PGSQL-PASSWORD';"
Next, Open /var/lib/pgsql/data/pg_hba.conf in your favorite editor.
vim /var/lib/pgsql/data/pg_hba.conf
Scroll down to the bottom of the file and replace all peer and ident strings with md5 string.
# TYPE  DATABASE    USER        CIDR-ADDRESS          METHOD

# "local" is for Unix domain socket connections only

local   all         all                               md5

# IPv4 local connections:

host    all         all         127.0.0.1/32          md5

# IPv6 local connections:

host    all         all         ::1/128               md5
Save the file. Press CTRL+Z to go back from postgres shell.
Restart PostgreSQL service
systemctl restart postgresql.service
Now we have finished backend configuration for openfire.
GUI setup
You can access the GUI of Openfire by pointing your browser to the following URL, http://<YOUR-SERVER-IP>:9090
This is the screen that will welcome you. We can choose preferable language and hit continue.

In the next screen you can enter your domain which will be the part of your XMPP id. hit continue.

Fill in database settings according to our previous steps when we created openfire user. hit continue.

In the next screen, We will choose “Default” option to store users and groups in the server database. hit continue.

Next screen allows Fill in your email address and set preferred password. hit continue.

All the steps have been completed successfully. Now we can login with new credentials. (admin / your password)

how to increase java memory:
vim /etc/sysconfig/openfire
OPENFIRE_OPTS="-Xmx2024m"
restart openfire,
thats all
Sunday, 7 January 2018
Thursday, 7 July 2016
Step-by-Step configuration LOG server-client
Sample Exam question:- You are a System administrator. Using Log files very easy to monitor the system. Now there are 40 servers running as Mail, Web, Proxy, DNS services etc. Your task is to centralize the logs from all servers into on LOG Server. How will you configure the LOG Server to accept logs from remote host ?
Answer with Explanation
An important part of maintaining a secure system is keeping track of the activities that take place on the system. If you know what usually happens, such as understanding when users log into your system, you can use log files to spot unusual activity. You can configure what syslogd records through the /etc/syslog.conf configuration file.
The syslogd daemon manages all the logs on your system and coordinates with any of the logging operations of other systems on your network. Configuration information for syslogd is held in the /etc/syslog.conf file, which contains the names and locations for your system log files.
By Default system accept the logs only generated from local host. In this example we will configure a log server and will accept logs from client side.
For this example we are using two systems one linux server one linux clients . To complete these per quest of log server Follow this link
A linux server with ip address 192.168.0.254 and hostname Server
A linux client with ip address 192.168.0.1 and hostname Client1
Updated /etc/hosts file on both linux system
Running portmap and xinetd services
Firewall should be off on server
We have configured all these steps in our pervious article.
We suggest you to review that article before start configuration of log server. Once you have completed the necessary steps follow this guide.
Check syslog, portmap, xinetd service in system service it should be on
#setup
Select System service from list
[*]portmap
[*]xinetd
[*]syslog
Now restart xinetd and portmap service
To keep on these services after reboot on then via chkconfig command
After reboot verify their status. It must be in running condition
Now open the /etc/sysconfig/syslog file
and locate SYSLOGD_OPTIONS tag
add -r option in this tag to accepts logs from clients
-m 0 disables 'MARK' messages.
-r enables logging from remote machines
-x disables DNS lookups on messages recieved with -r
After saving file restart service with service syslog restart command
On Linux client
ping from log server and open /etc/syslog.conf file
Now go to the end of file and do entry for serve as user.* @ [ server IP] as shown in image
After saving file restart service with service syslog restart command
Now restart the client so it can send log entry to server. ( Note that these logs will generate when client boot, so do it restart not shutdown)
Check clients log on Log server
To check the message of client on server open
In the end of this file you can check the log from clients
by
cnuvasan@gmail.com
*******************************ALL THE BEST************************************
Thursday, 30 June 2016
How to configure failover and high availability network bonding on Linux
This tutorial explains how to configure network bonding on Linux server. Before I start, let me explain what network bonding is and what it does. In a Windows environment, network bonding is called network teaming, this is a feature that helps any server architecture to provide high availability and failover in scenarios were one of the main ethernet cable has a malfunction or is misconfigured.
Normally, it is a best practice and a must have feature to be implemented when you set up a server for production purpose. Eventhough, this feature can be done in a Linux environment configuration, yet you have to confirm first with your network admin to ensure the switches that are linked to your server have support for network bonding. There are several bonding-modes that you can be implemented in your server environment. Below is a list of the available modes and what they do:
For this tutorial, I am using Oracle Linux 6.4 in the 32bit version. Please note that even though the configuration are done under Oracle Linux, the steps are applicable also to CentOS and Red Hat OS distro and to 64Bit systems as wwell. The end result of our example setup will show that the connection made to our bonding server will remain connected even though I've disabled 1 of the ethernet networks. In this example, I'll show how to apply network bonding using mode 1 which is the active-backup policy.
For this process, there's no installation needed. A default Linux installation of a server includes all required packages for a network bonding configuration.
Before we start the configuration, first we need to ensure we have at least 2 ethernet interfaces configured in our server. To check this, go to the network configuration folder and list the available ethernet interfaces. Below are the steps:
Now let's configure a bonding interface called BOND0. This interface will be a virtual ethernet interface that contains the physical ethernet interface of ETH0 and ETH1. Below are the steps:
That's all. Please notice that inside the BOND0 interface, I've included an IP address. This IP address will be the only IP address connected to our server. To proceed in the process, we need to modify the physical ethernet interface related to the BOND0 interface. Below are the steps:
To proceed with the configuration. Let's create a bonding configuration file named bonding.conf under /etc/modprobe.d . Below are the steps:
As everything is setup, let's restart the network service in order to load the new configuration. Below are the steps:
Excellent, now we have loaded the new configuration that we had made above. You'll notice that the new interface called BOND0 will be shown on the network list. You also will notice that there is no IP address assigned to the interface ETH0 and ETH1 interfaces, only the BOND0 interface shows the IP.
You can also check the bonding status via this command:
Now as everything is configured as expected. Let's made a simple test to ensure the configuration we made is correct. For this test, we will login to a new server (or Linux desktop) and start pinging our bonding server to see if there's an intermittent connection happen during the test. Below are the steps:
During this time, let's go back to our bonding server and turn off the ethernet interface ETH0. Below are the steps:
Great, now you'll see that even though we have shutdown the interface ETH0, we are still able to ping and access our bonding server. Now let's do 1 more test. Turn back on ETH0 interface and turn off ETH1 interface.
Now let's go back to the test server and check what happen on the continous ping made to our bonding server
Thumbs up! We've successfully configured and proven our bonding server manages to cater the disaster recovery scenario on a network fail over condition.
Thanks to :https://www.howtoforge.com/tutorial/how-to-configure-high-availability-and-network-bonding-on-linux/
Normally, it is a best practice and a must have feature to be implemented when you set up a server for production purpose. Eventhough, this feature can be done in a Linux environment configuration, yet you have to confirm first with your network admin to ensure the switches that are linked to your server have support for network bonding. There are several bonding-modes that you can be implemented in your server environment. Below is a list of the available modes and what they do:
- Balance-rr
This mode provides load balancing and fault tolerance (failover) features via round-robin policy. Means that it transmits packets in sequential order from the first available slave through the last. - Active-Backup
This mode provides fault tolerance features via active-backup policy. It means that once the bonding ethernet is up, only 1 of the ethernet slaves is active. The other ethernet slave will only become active if and only if the current active slave fails to be up. If you choose this mode, you will notice that the bonding MAC address is externally visible on only one network adapter. This is to avoid confusing the switch. - Balance-xor
This mode provides load balancing and fault tolerance. It transmits based on the selected transmit hash policy. Alternate transmit policies may be selected via the xmit_hash_policy option. - Broadcast
This mode provides fault tolerance only. It transmits everything on all slave ethernet interfaces. - 802.3ad
This mode provides load balancing and fault tolerance. It creates an aggregation group that shares the same speed and duplex settings. It utilizes all slave ethernet interfaces in the active aggregator, it is based on the 802.3ad specification. To implement this mode, the ethtool must support the base drivers for retrieving the speed and duplex mode of each slave. The switch must also support dynamic link aggregation. Normally, this requires Network Engineer intervention for detailed configuration. - Balance-TLB
This mode provides load balancing capabilities as the name TLB represent transmit load balancing. For this mode, if configuration tlb_dynamic_lb = 1, then the outgoing traffic is distributed according to current load on each slave. If configuration tlb_dynamic_lb = 0 then the load balancing is disabled, yet the load is distributed only using the hasd distribution. For this mode, the ethtool must support the base drivers for retrieving the speed of each slave. - Balance-ALB
This mode provides load balancing capabilities as the name TLB represents adaptive load balancing. Similar to balance-tlb, except that both send and receive traffic are bonded. It receives load balancing by achieving ARP negotiation. The bonding driver intercepts the ARP Replies sent by the local system on their way out and overwrites the source hardware address with the unique hardware address of one of the slaves in the bond. For this mode, the ethtool must support the base drivers for retreiving the speed of each slave.
1. Preliminary Note
For this tutorial, I am using Oracle Linux 6.4 in the 32bit version. Please note that even though the configuration are done under Oracle Linux, the steps are applicable also to CentOS and Red Hat OS distro and to 64Bit systems as wwell. The end result of our example setup will show that the connection made to our bonding server will remain connected even though I've disabled 1 of the ethernet networks. In this example, I'll show how to apply network bonding using mode 1 which is the active-backup policy.
2. Installation Phase
For this process, there's no installation needed. A default Linux installation of a server includes all required packages for a network bonding configuration.
3. Configuration Phase
Before we start the configuration, first we need to ensure we have at least 2 ethernet interfaces configured in our server. To check this, go to the network configuration folder and list the available ethernet interfaces. Below are the steps:
cd /etc/sysconfig/network-scripts/
ls *ifcfg*eth*
The result is:ls *ifcfg*eth*
ifcfg-eth0 ifcfg-eth1
Notice that we currently have 2 ethernet interfaces by setup in our server which are ETH0 and ETH1. Now let's configure a bonding interface called BOND0. This interface will be a virtual ethernet interface that contains the physical ethernet interface of ETH0 and ETH1. Below are the steps:
vi ifcfg-bond0
DEVICE=bond0
ONBOOT=yes
MASTER=yes
IPADDR=172.20.43.110
NETMASK=255.255.255.0
GATEWAY=172.20.43.1
BONDING_OPTS="mode=1 miimon=100"
TYPE=Ethernet
Then run:
ls *ifcfg*bon*
The result is:
ifcfg-bond0
That's all. Please notice that inside the BOND0 interface, I've included an IP address. This IP address will be the only IP address connected to our server. To proceed in the process, we need to modify the physical ethernet interface related to the BOND0 interface. Below are the steps:
vi ifcfg-eth0
DEVICE=eth0
TYPE=Ethernet
ONBOOT=yes
NM_CONTROLLED=no
MASTER=bond0
SLAVE=yes
vi ifcfg-eth1
DEVICE=eth1
TYPE=Ethernet
ONBOOT=yes
NM_CONTROLLED=no
MASTER=bond0
SLAVE=yes
Done. We've made the modification of the interface ETH0 and ETH1. Notice that we've removed the IP address inside both interfaces and appended MASTER = bond0. This is needed to validate that both interfaces will be virtual interfaces which are dedicated to the ethernet BOND0 interface. To proceed with the configuration. Let's create a bonding configuration file named bonding.conf under /etc/modprobe.d . Below are the steps:
vi /etc/modprobe.d/bonding.conf
alias bond0 bonding
options bond0 mode=1 miimon=100
modprobe bonding
Based on the above config, we've configured a bonding module using interface BOND0. We also assigned the bonding configuration to use mode = 1 which is active-backup policy. The option miimon = 100 represents the monitoring frequency for our bonding server to monitor the interface status in milli seconds. As per description above, this mode will provide fault tolerance features in the server network configuration. As everything is setup, let's restart the network service in order to load the new configuration. Below are the steps:
service network restart
Shutting down interface eth0: [ OK ]
Shutting down interface eth1: [ OK ]
Shutting down loopback interface: [ OK ]
Bringing up loopback interface: [ OK ]
Bringing up interface bond0: [ OK ]
Shutting down interface eth1: [ OK ]
Shutting down loopback interface: [ OK ]
Bringing up loopback interface: [ OK ]
Bringing up interface bond0: [ OK ]
Excellent, now we have loaded the new configuration that we had made above. You'll notice that the new interface called BOND0 will be shown on the network list. You also will notice that there is no IP address assigned to the interface ETH0 and ETH1 interfaces, only the BOND0 interface shows the IP.
ifconfig
bond0 Link encap:Ethernet HWaddr 08:00:27:61:E4:88
inet addr:172.20.43.110 Bcast:172.20.43.255 Mask:255.255.255.0
inet6 addr: fe80::a00:27ff:fe61:e488/64 Scope:Link
UP BROADCAST RUNNING MASTER MULTICAST MTU:1500 Metric:1
RX packets:1723 errors:0 dropped:0 overruns:0 frame:0
TX packets:1110 errors:0 dropped:0 overruns:0 carrier:0
collisions:0 txqueuelen:0
RX bytes:147913 (144.4 KiB) TX bytes:108429 (105.8 KiB)
eth0 Link encap:Ethernet HWaddr 08:00:27:61:E4:88
UP BROADCAST RUNNING SLAVE MULTICAST MTU:1500 Metric:1
RX packets:1092 errors:0 dropped:0 overruns:0 frame:0
TX packets:1083 errors:0 dropped:0 overruns:0 carrier:0
collisions:0 txqueuelen:1000
RX bytes:103486 (101.0 KiB) TX bytes:105439 (102.9 KiB)
UP BROADCAST RUNNING SLAVE MULTICAST MTU:1500 Metric:1
RX packets:1092 errors:0 dropped:0 overruns:0 frame:0
TX packets:1083 errors:0 dropped:0 overruns:0 carrier:0
collisions:0 txqueuelen:1000
RX bytes:103486 (101.0 KiB) TX bytes:105439 (102.9 KiB)
eth1 Link encap:Ethernet HWaddr 08:00:27:61:E4:88
UP BROADCAST RUNNING SLAVE MULTICAST MTU:1500 Metric:1
RX packets:632 errors:0 dropped:0 overruns:0 frame:0
TX packets:28 errors:0 dropped:0 overruns:0 carrier:0
collisions:0 txqueuelen:1000
RX bytes:44487 (43.4 KiB) TX bytes:3288 (3.2 KiB)
UP BROADCAST RUNNING SLAVE MULTICAST MTU:1500 Metric:1
RX packets:632 errors:0 dropped:0 overruns:0 frame:0
TX packets:28 errors:0 dropped:0 overruns:0 carrier:0
collisions:0 txqueuelen:1000
RX bytes:44487 (43.4 KiB) TX bytes:3288 (3.2 KiB)
lo Link encap:Local Loopback
inet addr:127.0.0.1 Mask:255.0.0.0
inet6 addr: ::1/128 Scope:Host
UP LOOPBACK RUNNING MTU:16436 Metric:1
RX packets:208 errors:0 dropped:0 overruns:0 frame:0
TX packets:208 errors:0 dropped:0 overruns:0 carrier:0
collisions:0 txqueuelen:0
RX bytes:18080 (17.6 KiB) TX bytes:18080 (17.6 KiB)
inet addr:127.0.0.1 Mask:255.0.0.0
inet6 addr: ::1/128 Scope:Host
UP LOOPBACK RUNNING MTU:16436 Metric:1
RX packets:208 errors:0 dropped:0 overruns:0 frame:0
TX packets:208 errors:0 dropped:0 overruns:0 carrier:0
collisions:0 txqueuelen:0
RX bytes:18080 (17.6 KiB) TX bytes:18080 (17.6 KiB)
You can also check the bonding status via this command:
cat /proc/net/bonding/bond0
Ethernet Channel Bonding Driver: v3.6.0 (September 26, 2009)
Bonding Mode: fault-tolerance (active-backup)
Primary Slave: None
Currently Active Slave: eth0
MII Status: up
MII Polling Interval (ms): 100
Up Delay (ms): 0
Down Delay (ms): 0
Primary Slave: None
Currently Active Slave: eth0
MII Status: up
MII Polling Interval (ms): 100
Up Delay (ms): 0
Down Delay (ms): 0
Slave Interface: eth0
MII Status: up
Speed: 1000 Mbps
Duplex: full
Link Failure Count: 0
Permanent HW addr: 08:00:27:61:e4:88
Slave queue ID: 0
MII Status: up
Speed: 1000 Mbps
Duplex: full
Link Failure Count: 0
Permanent HW addr: 08:00:27:61:e4:88
Slave queue ID: 0
Slave Interface: eth1
MII Status: up
Speed: 1000 Mbps
Duplex: full
Link Failure Count: 0
Permanent HW addr: 08:00:27:c8:46:40
Slave queue ID: 0
Notice on the above that we've successfully converted the interfaces ETH0 and ETH1 into a bonding configuration using active-backup mode. Stated also now the server is using interface ETH0, ETH1 will be as backup interface .MII Status: up
Speed: 1000 Mbps
Duplex: full
Link Failure Count: 0
Permanent HW addr: 08:00:27:c8:46:40
Slave queue ID: 0
4. Testing Phase
Now as everything is configured as expected. Let's made a simple test to ensure the configuration we made is correct. For this test, we will login to a new server (or Linux desktop) and start pinging our bonding server to see if there's an intermittent connection happen during the test. Below are the steps:
login as: root
root@172.20.43.120's password:
Last login: Wed Sep 14 12:50:15 2016 from 172.20.43.80
root@172.20.43.120's password:
Last login: Wed Sep 14 12:50:15 2016 from 172.20.43.80
ping 172.20.43.110
PING 172.20.43.110 (172.20.43.110) 56(84) bytes of data.
64 bytes from 172.20.43.110: icmp_seq=1 ttl=64 time=0.408 ms
64 bytes from 172.20.43.110: icmp_seq=2 ttl=64 time=0.424 ms
64 bytes from 172.20.43.110: icmp_seq=3 ttl=64 time=0.415 ms
64 bytes from 172.20.43.110: icmp_seq=4 ttl=64 time=0.427 ms
64 bytes from 172.20.43.110: icmp_seq=5 ttl=64 time=0.554 ms
64 bytes from 172.20.43.110: icmp_seq=6 ttl=64 time=0.443 ms
64 bytes from 172.20.43.110: icmp_seq=7 ttl=64 time=0.663 ms
64 bytes from 172.20.43.110: icmp_seq=8 ttl=64 time=0.961 ms
64 bytes from 172.20.43.110: icmp_seq=9 ttl=64 time=0.461 ms
64 bytes from 172.20.43.110: icmp_seq=10 ttl=64 time=0.544 ms
64 bytes from 172.20.43.110: icmp_seq=11 ttl=64 time=0.412 ms
64 bytes from 172.20.43.110: icmp_seq=12 ttl=64 time=0.464 ms
64 bytes from 172.20.43.110: icmp_seq=13 ttl=64 time=0.432 ms
ifconfig eth0
eth0 Link encap:Ethernet HWaddr 08:00:27:61:E4:88
UP BROADCAST RUNNING SLAVE MULTICAST MTU:1500 Metric:1
RX packets:1092 errors:0 dropped:0 overruns:0 frame:0
TX packets:1083 errors:0 dropped:0 overruns:0 carrier:0
collisions:0 txqueuelen:1000
RX bytes:103486 (201.0 KiB) TX bytes:105439 (122.9 KiB)
UP BROADCAST RUNNING SLAVE MULTICAST MTU:1500 Metric:1
RX packets:1092 errors:0 dropped:0 overruns:0 frame:0
TX packets:1083 errors:0 dropped:0 overruns:0 carrier:0
collisions:0 txqueuelen:1000
RX bytes:103486 (201.0 KiB) TX bytes:105439 (122.9 KiB)
ifdown eth0
Now we have turned off the services for the network interface ETH0. Let's check the bonding status. Below are the steps:
cat /proc/net/bonding/bond0
Ethernet Channel Bonding Driver: v3.6.0 (September 26, 2009)
Bonding Mode: fault-tolerance (active-backup)
Primary Slave: None
Currently Active Slave: eth1
MII Status: up
MII Polling Interval (ms): 100
Up Delay (ms): 0
Down Delay (ms): 0
Primary Slave: None
Currently Active Slave: eth1
MII Status: up
MII Polling Interval (ms): 100
Up Delay (ms): 0
Down Delay (ms): 0
Slave Interface: eth1
MII Status: up
Speed: 1000 Mbps
Duplex: full
Link Failure Count: 0
Permanent HW addr: 08:00:27:c8:46:40
Slave queue ID: 0
You will notice, that now the ETH0 interface does not exist in bonding status anymore. During this time, let's go back to the previous test server and check the continuous ping to our bonding server. MII Status: up
Speed: 1000 Mbps
Duplex: full
Link Failure Count: 0
Permanent HW addr: 08:00:27:c8:46:40
Slave queue ID: 0
64 bytes from 172.20.43.110: icmp_seq=22 ttl=64 time=0.408 ms
64 bytes from 172.20.43.110: icmp_seq=23 ttl=64 time=0.402 ms
64 bytes from 172.20.43.110: icmp_seq=24 ttl=64 time=0.437 ms
64 bytes from 172.20.43.110: icmp_seq=25 ttl=64 time=0.504 ms
64 bytes from 172.20.43.110: icmp_seq=26 ttl=64 time=0.401 ms
64 bytes from 172.20.43.110: icmp_seq=27 ttl=64 time=0.454 ms
64 bytes from 172.20.43.110: icmp_seq=28 ttl=64 time=0.432 ms
64 bytes from 172.20.43.110: icmp_seq=29 ttl=64 time=0.434 ms
64 bytes from 172.20.43.110: icmp_seq=30 ttl=64 time=0.411 ms
64 bytes from 172.20.43.110: icmp_seq=31 ttl=64 time=0.554 ms
64 bytes from 172.20.43.110: icmp_seq=32 ttl=64 time=0.452 ms
64 bytes from 172.20.43.110: icmp_seq=33 ttl=64 time=0.408 ms
64 bytes from 172.20.43.110: icmp_seq=34 ttl=64 time=0.491 ms
Great, now you'll see that even though we have shutdown the interface ETH0, we are still able to ping and access our bonding server. Now let's do 1 more test. Turn back on ETH0 interface and turn off ETH1 interface.
ifup eth0
cat /proc/net/bonding/bond0
cat /proc/net/bonding/bond0
Ethernet Channel Bonding Driver: v3.6.0 (September 26, 2009)
Bonding Mode: fault-tolerance (active-backup)
Primary Slave: None
Currently Active Slave: eth1
MII Status: up
MII Polling Interval (ms): 100
Up Delay (ms): 0
Down Delay (ms): 0
Primary Slave: None
Currently Active Slave: eth1
MII Status: up
MII Polling Interval (ms): 100
Up Delay (ms): 0
Down Delay (ms): 0
Slave Interface: eth1
MII Status: up
Speed: 1000 Mbps
Duplex: full
Link Failure Count: 0
Permanent HW addr: 08:00:27:c8:46:40
Slave queue ID: 0
MII Status: up
Speed: 1000 Mbps
Duplex: full
Link Failure Count: 0
Permanent HW addr: 08:00:27:c8:46:40
Slave queue ID: 0
Slave Interface: eth0
MII Status: up
Speed: 1000 Mbps
Duplex: full
Link Failure Count: 0
Permanent HW addr: 08:00:27:61:e4:88
Slave queue ID: 0
As the ETH0 interface was already up, let's shutdown ETH1 interface. MII Status: up
Speed: 1000 Mbps
Duplex: full
Link Failure Count: 0
Permanent HW addr: 08:00:27:61:e4:88
Slave queue ID: 0
ifdown eth1
cat /proc/net/bonding/bond0
Ethernet Channel Bonding Driver: v3.6.0 (September 26, 2009)
Bonding Mode: fault-tolerance (active-backup)
Primary Slave: None
Currently Active Slave: eth0
MII Status: up
MII Polling Interval (ms): 100
Up Delay (ms): 0
Down Delay (ms): 0
Primary Slave: None
Currently Active Slave: eth0
MII Status: up
MII Polling Interval (ms): 100
Up Delay (ms): 0
Down Delay (ms): 0
Slave Interface: eth0
MII Status: up
Speed: 1000 Mbps
Duplex: full
Link Failure Count: 0
Permanent HW addr: 08:00:27:61:e4:88
Slave queue ID: 0
MII Status: up
Speed: 1000 Mbps
Duplex: full
Link Failure Count: 0
Permanent HW addr: 08:00:27:61:e4:88
Slave queue ID: 0
Now let's go back to the test server and check what happen on the continous ping made to our bonding server
64 bytes from 172.20.43.110: icmp_seq=84 ttl=64 time=0.437 ms
64 bytes from 172.20.43.110: icmp_seq=85 ttl=64 time=0.504 ms
64 bytes from 172.20.43.110: icmp_seq=86 ttl=64 time=0.401 ms
64 bytes from 172.20.43.110: icmp_seq=87 ttl=64 time=0.454 ms
64 bytes from 172.20.43.110: icmp_seq=88 ttl=64 time=0.432 ms
64 bytes from 172.20.43.110: icmp_seq=89 ttl=64 time=0.434 ms
64 bytes from 172.20.43.110: icmp_seq=90 ttl=64 time=0.411 ms
64 bytes from 172.20.43.110: icmp_seq=91 ttl=64 time=0.420 ms
64 bytes from 172.20.43.110: icmp_seq=92 ttl=64 time=0.487 ms
64 bytes from 172.20.43.110: icmp_seq=93 ttl=64 time=0.551 ms
64 bytes from 172.20.43.110: icmp_seq=94 ttl=64 time=0.523 ms
64 bytes from 172.20.43.110: icmp_seq=95 ttl=64 time=0.479 ms
Thumbs up! We've successfully configured and proven our bonding server manages to cater the disaster recovery scenario on a network fail over condition.
Thanks to :https://www.howtoforge.com/tutorial/how-to-configure-high-availability-and-network-bonding-on-linux/
Subscribe to:
Posts (Atom)